Unidad 4: conexión WiFi
Sesión 1
En esta sesión haremos lo siguiente:
Analizaremos la estructura del proyecto 3_wifi_connection.
Ejercicios
Ejercicios 1: introducción al proyecto
Abre el proyecto 3_wifi_connection. No olvides configurar los puertos
de entrada-salida correspondientes a tu hardware usando el archivo
board_esp32_devkitc.h.
Lee la descripción de este proyecto aquí.
Ejercicios 2: ejecución del proyecto
Abre el archivo app_main.c. Nota que ahora hay más código en este
archivo que antes. El código modela los siguientes procesos:
Inicia la partición NVS.
Inicia el stack de comunicación TCP/IP.
Inicia el event loop.
Inicia el WiFi en modo estación.
Configura las constantes
#define EXAMPLE_ESP_WIFI_SSID EL_NOMBRE_DE_TU_RED_WIFI
#define EXAMPLE_ESP_WIFI_PASS LA_CLAVE_DE_TU_RED
Ejecuta el programa y verifica que el ESP32 puede conectarse a tu red WiFi.
¿Qué dirección IP le asigna tu access point al ESP32?
Ejercicio 3: nvs
Observa de nuevo el siguiente código en app_main.c:
...
/* Initialize NVS partition */
esp_err_t ret = nvs_flash_init();
if (ret == ESP_ERR_NVS_NO_FREE_PAGES || ret == ESP_ERR_NVS_NEW_VERSION_FOUND) {
    /* NVS partition was truncated
     * and needs to be erased */
    ret = nvs_flash_erase();

    /* Retry nvs_flash_init */
    ret |= nvs_flash_init();
}
if (ret != ESP_OK) {
    ESP_LOGE(TAG, "Failed to init NVS");
    return;
}
...
Este código llama la función nvs_flash_init. ¿Para qué? Para inicializar la biblioteca
Non-volatile storage (NVS).
Este biblioteca sirve para guardar información de tipo CLAVE-VALOR en la memoria flash. Esta
funcionalidad es utilizada por el driver de WiFi.
Ejercicio 4: modelo de programación del WiFi
La siguiente figura, tomada de la documentación del fabricante, muestra el modelo de programación al usar el WiFi del ESP32:

Nota que uno de los bloques es el stack de TCP/IP. Por tanto en app_main.c
se inicializa:
/* Initialize TCP/IP and the event loop */
tcpip_adapter_init();
Ahora mira en el diagrama que la biblioteca produce EVENTOS. Son precisamente los eventos la manera con la cual la biblioteca se comunica con tu aplicación.
De regreso a app_main.c, la siguiente línea de código le dice a la biblioteca
cuál será el callback de tu aplicación que deberá llamar cuando se produzcan los eventos:
ESP_ERROR_CHECK(esp_event_loop_init(event_handler, NULL) );
Mira el callback:
static esp_err_t event_handler(void *ctx, system_event_t *event)
{
    switch (event->event_id) {
    case SYSTEM_EVENT_STA_START:
        esp_wifi_connect();
        break;
    case SYSTEM_EVENT_STA_GOT_IP:
        ESP_LOGI(TAG, "Connected with IP Address:%s", ip4addr_ntoa(&event->event_info.got_ip.ip_info.ip));
        break;
    case SYSTEM_EVENT_STA_DISCONNECTED:
        ESP_LOGI(TAG, "Disconnected. Connecting to the AP again...\n");
        esp_wifi_connect();
        break;
    default:
        break;
    }
    return ESP_OK;
}
Nota que en este caso solo vamos a procesar estos eventos: SYSTEM_EVENT_STA_START, SYSTEM_EVENT_STA_GOT_IP, SYSTEM_EVENT_STA_DISCONNECTED; sin embargo, se podrían recibir otros más.
Finalmente, observa que estamos iniciando el ESP32 en modo Station para poder conectarnos
a un access point (el que tienes en tu casa).
/* Start the station */
wifi_init_sta();
La función inicializa el WiFi con valores por defecto (WIFI_INIT_CONFIG_DEFAULT)
y en modo STATION. Configura la red a la cual se conectará el ESP32 y dará la
orden iniciar en modo STATION. De este punto en adelante, la interacción
con la biblioteca se realizará por medio del administrador de eventos: event_handler.
Una vez la biblioteca configure correctamente el driver WiFi y el modo de operación,
se llamará a esp_wifi_start() para iniciar al ESP32 en modo STATION.
static void wifi_init_sta()
{
    wifi_init_config_t cfg = WIFI_INIT_CONFIG_DEFAULT();
    ESP_ERROR_CHECK(esp_wifi_init(&cfg));
    ESP_ERROR_CHECK(esp_wifi_set_storage(WIFI_STORAGE_RAM));
    ESP_ERROR_CHECK(esp_wifi_set_mode(WIFI_MODE_STA) );

    wifi_config_t wifi_config = {
        .sta = {
            .ssid = EXAMPLE_ESP_WIFI_SSID,
            .password = EXAMPLE_ESP_WIFI_PASS,
        },
    };
    ESP_ERROR_CHECK(esp_wifi_set_config(ESP_IF_WIFI_STA, &wifi_config) );

    ESP_ERROR_CHECK(esp_wifi_start() );

    ESP_LOGI(TAG, "connect to ap SSID:%s password:%s",
            EXAMPLE_ESP_WIFI_SSID, EXAMPLE_ESP_WIFI_PASS);
}
Ejercicio 5: EVENTOS
En el proyecto se están manejando 3 eventos, pero hay más eventos para informarle a la aplicación:
SYSTEM_EVENT_STA_START: el ESP32 ya inició en modo STATION. Y ahora si puede conectarse al ACCESS POINT (AP):
esp_wifi_connect();SYSTEM_EVENT_STA_GOT_IP: el ESP32 ya se conectó a un Access Point y este le asignó una dirección ip.
SYSTEM_EVENT_STA_DISCONNECTED: indica que el ESP32 se desconectó del AP.
Ejercicio 6: reto 1
Adicionar un evento más que informe por el puerto serial si el ESP32 ya se conectó al AP.
Ejercicio 7: reto 2
Verifica que al desconectar tu AP de la energía, el ESP32 reporta que se desconectó.
Vuelve a energizar tu AP y ahora verifica que el ESP32 reporte que está conectado de nuevo.
Ejercicio 8: profundizar un poco más en el funcionamiento
Si quieres profundizar un poco más en el funcionamiento del WiFi dale una mirada a este artículo.
Te dejo también un enlace a un blog donde puedes mantenerte actualizo con las novedades del mundo de los ESP32.
Ejercicio 9: networking
Warning
Para que hagas luego del curso
El estudio de la programación en red (networking programming) nos daría para un curso completo. Una de las ventajas que tiene el esp-idf es que podamos interactuar con el stack de TCPIP usando sockets POSIX.
Aunque está por fuera de los alcances de este curso corto, me gustaría que al menos le dieras una mirada superficial a algunas partes del material del curso sistemas operativos que dicto en el pregrado ingeniería de sistemas de la UPB en la facultad TIC para que te des una idea de cómo se puede utilizar la interfaz sockets POSIX para hacer networking. El material lo encuentras en este sitio.
Puedes ver en particular esta presentación donde se explica qué es un socket y este ejemplo , donde verás un servidor y un cliente TCP.
Adicionalmente, cuando termines el curso podrás seguir explorando y aprendiendo más con los ejemplos que vienen directamente con el esp-idf aquí.
Ejercicio 10: RTOS-introducción
Los RTOS (real time operating systems) son una evolución de la arquitectura de programación
clásica background-foreground. La idea entonces de un RTOS es ofrecernos un ambiente
de programación con múltiples background funcionando de manera concurrente, es decir, es
como tener un programa de arduino con múltiples ciclos loop() concurrentes.
El siguiente código muestra un ejemplo típico de una arquitectura background/foreground:
 1 // background code:
 2
 3 #include <stdint.h>
 4 #include "bsp.h"
 5
 6 int main() {
 7     BSP_init();
 8     while (1) {
 9         BSP_ledGreenOn();
10         BSP_delay(BSP_TICKS_PER_SEC / 4U);
11         BSP_ledGreenOff();
12         BSP_delay(BSP_TICKS_PER_SEC * 3U / 4U);
13     }
14     return 0;
15 }
 1 // foreground code: blocking version
 2
 3 #include <stdint.h>  /* Standard integers. WG14/N843 C99 Standard */
 4 #include "bsp.h"
 5 #include "TM4C123GH6PM.h" /* the TM4C MCU Peripheral Access Layer (TI) */
 6
 7 /* on-board LEDs */
 8 #define LED_BLUE  (1U << 2)
 9
10 static uint32_t volatile l_tickCtr;
11
12 void SysTick_Handler(void) {
13     ++l_tickCtr;
14 }
15
16 void BSP_init(void) {
17     SYSCTL->RCGCGPIO  |= (1U << 5); /* enable Run mode for GPIOF */
18     SYSCTL->GPIOHBCTL |= (1U << 5); /* enable AHB for GPIOF */
19     GPIOF_AHB->DIR |= (LED_RED | LED_BLUE | LED_GREEN);
20     GPIOF_AHB->DEN |= (LED_RED | LED_BLUE | LED_GREEN);
21     SystemCoreClockUpdate();
22     SysTick_Config(SystemCoreClock / BSP_TICKS_PER_SEC);
23     __enable_irq();
24 }
25
26 uint32_t BSP_tickCtr(void) {
27     uint32_t tickCtr;
28     __disable_irq();
29     tickCtr = l_tickCtr;
30     __enable_irq();
31     return tickCtr;
32 }
33
34 void BSP_delay(uint32_t ticks) {
35     uint32_t start = BSP_tickCtr();
36     while ((BSP_tickCtr() - start) < ticks) {
37     }
38 }
39
40 void BSP_ledGreenOn(void) {
41     GPIOF_AHB->DATA_Bits[LED_GREEN] = LED_GREEN;
42 }
43
44 void BSP_ledGreenOff(void) {
45     GPIOF_AHB->DATA_Bits[LED_GREEN] = 0U;
46 }
Es importante notar que el código anterior es bloqueante (¿Qué es eso?). La función
BSP_delay(BSP_TICKS_PER_SEC / 4U); consume todos los recursos de la CPU en espera ocupada.
A esto también lo llamamos polling.
¿Cómo superamos la espera ocupada? Utilizando la excelente técnica de programación conocida como máquinas de estado:
 1 /* Blinky polling state machine */
 2 static enum {
 3     INITIAL,
 4     OFF_STATE,
 5     ON_STATE
 6 } state = INITIAL;
 7
 8 // background code: non-blocking version
 9 int main() {
10     BSP_init();
11     while (1) {
12         static uint32_t start;
13         switch (state) {
14             case INITIAL:
15                 start = BSP_tickCtr();
16                 state = OFF_STATE; /* initial transition */
17                 break;
18             case OFF_STATE:
19                 if ((BSP_tickCtr() - start) > BSP_TICKS_PER_SEC * 3U / 4U) {
20                     BSP_ledGreenOn();
21                     start = BSP_tickCtr();
22                     state = ON_STATE; /* state transition */
23                 }
24                 break;
25             case ON_STATE:
26                 if ((BSP_tickCtr() - start) > BSP_TICKS_PER_SEC / 4U) {
27                     BSP_ledGreenOff();
28                     start = BSP_tickCtr();
29                     state = OFF_STATE; /* state transition */
30                 }
31                 break;
32             default:
33                 //error();
34                 break;
35         }
36     }
37     //return 0;
38 }
En ambos códigos, espera ocupada y máquinas de estado, la arquitectura background/foreground se puede entender como ilustra la figura:
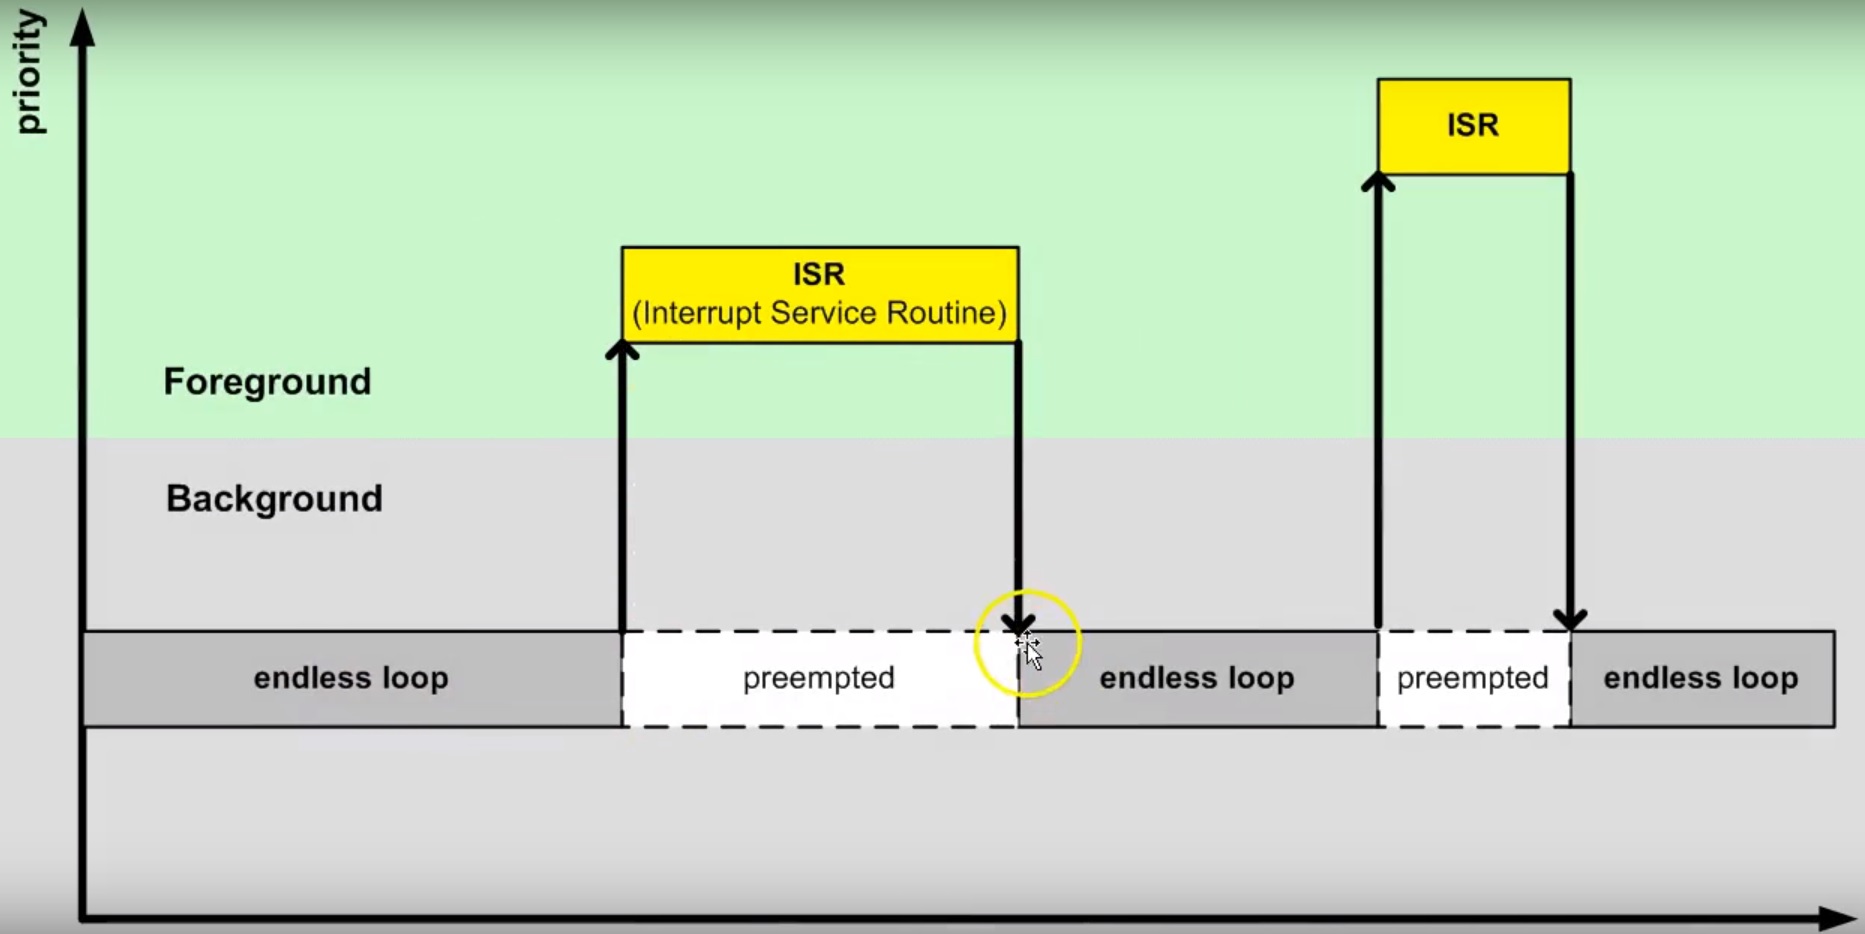
El código que enciende y apaga el LED corre en el background. Cuando ocurre la
interrupción SysTick_Handler el background será despojado de la CPU de la cual
se apropiará (preemption) el servicio de atención a
la interrupción o ISR en el foreground. Una vez termine la ejecución de la
ISR, el backgound retomará justo en el punto en el cual fue desalojado (preempted).
Nota también que la comunicación entre el background/foreground se realiza
por medio de la variable l_tickCtr. Adicionalmente, observa como la función
BSP_tickCtr accede la variable. ¿Por qué se hace de esa manera? Para evitar las
condiciones de carrera.
¿Qué son las condiciones de carrera?
Son condiciones que se presentan cuando dos entidades concurrentes compiten por un recurso haciendo que el estado del recurso dependa de la secuencia en la cual se accede.
Ejercicio 11: RTOS al rescate
Hasta este punto hemos ilustrado dos tipos de arquitecturas background/foreground, bloqueante
(en espera ocupada) y no bloqueante (máquinas de estado). En este punto vamos a concentrarnos
en evolucionar la versión bloqueante. Para ello,
intentaremos crear un programa, bloqueante, que encienda y apague dos LEDs de manera
independiente y concurrente. El siguiente código ilustra una intento de conseguir lo anterior:
 1 #include <stdint.h>
 2 #include "bsp.h"
 3
 4 int main() {
 5     volatile uint32_t run = 0U;
 6     BSP_init();
 7
 8     while (1) {
 9         BSP_ledGreenOn();
10         BSP_delay(BSP_TICKS_PER_SEC / 4U);
11         BSP_ledGreenOff();
12         BSP_delay(BSP_TICKS_PER_SEC * 3U / 4U);
13
14         BSP_ledBlueOn();
15         BSP_delay(BSP_TICKS_PER_SEC / 2U);
16         BSP_ledBlueOff();
17         BSP_delay(BSP_TICKS_PER_SEC / 3U);
18
19     }
20 }
Al ejecutar este código claramente se observa que los LEDs no están funcionando de manera concurrente e independiente. Aquí es donde entran en juego los sistemas operativos de tiempo real. Usando un RTOS se podría escribir la aplicación así:
 1 void main_blinky1() {
 2     while (1) {
 3         BSP_ledGreenOn();
 4         BSP_delay(BSP_TICKS_PER_SEC / 4U);
 5         BSP_ledGreenOff();
 6         BSP_delay(BSP_TICKS_PER_SEC * 3U / 4U);
 7     }
 8 }
 9
10 void main_blinky2() {
11     while (1) {
12         BSP_ledBlueOn();
13         BSP_delay(BSP_TICKS_PER_SEC / 2U);
14         BSP_ledBlueOff();
15         BSP_delay(BSP_TICKS_PER_SEC / 3U);
16     }
17 }
Ejercicio 12: FreeRTOS
En el caso de FreeRTOS la abstracción que permitiría ejecutar los dos códigos
del ejercicio anterior se denomina TAREA. La estructura de una tarea en
FreeRTOS es como muestra el siguiente código:
1 void vTaskCode( void * pvParameters )
2 {
3     for( ;; )
4     {
5         // Task code goes here.
6     }
7 }
Una tarea se representa en C con una función. La función NO debe retornar,
pero puede recibir en la variable pvParameters una dirección arbitraria.
En el siguiente código te muestro cómo podrías programar dos tareas en FreeRTOS que sean concurrentes e independientes:
 1 #include <stdio.h>
 2 #include "freertos/FreeRTOS.h"
 3 #include "freertos/task.h"
 4 #include "esp_system.h"
 5 #include "esp_spi_flash.h"
 6
 7
 8 void vTask1( void *pvParameters )
 9 {
10     const char *pcTaskName = "Task 1 is running\n";
11     for( ;; )
12     {
13         printf( pcTaskName );
14         vTaskDelay(1000/portTICK_PERIOD_MS);
15     }
16 }
17
18 void vTask2( void *pvParameters )
19 {
20     const char *pcTaskName = "Task 2 is running\n";
21
22     for( ;; )
23     {
24         printf( pcTaskName );
25         vTaskDelay(1500/portTICK_PERIOD_MS);
26     }
27 }
28
29
30 void app_main()
31 {
32     /* Create one of the two tasks. */
33     xTaskCreate(    vTask1,         /* Pointer to the function that implements the task. */
34                     "Task 1",       /* Text name for the task.  This is to facilitate debugging only. */
35                     2048,           /* Stack depth - most small microcontrollers will use much less stack than this. */
36                     NULL,           /* We are not using the task parameter. */
37                     1,                      /* This task will run at priority 1. */
38                     NULL );         /* We are not using the task handle. */
39
40     /* Create the other task in exactly the same way. */
41     xTaskCreate( vTask2, "Task 2", 2048, NULL, 1, NULL );
42 }
Ejercicio 13: FreeRTOS
En este ejercicios veremos que es posible crear tareas completamente independientes aunque utilicemos el mismo código. Es algo similar a definir una clase y luego instanciar dos objetos.
 1 #include <stdio.h>
 2 #include "freertos/FreeRTOS.h"
 3 #include "freertos/task.h"
 4 #include "esp_system.h"
 5 #include "esp_spi_flash.h"
 6
 7 void vTask( void *pvParameters )
 8 {
 9     const char *pcTaskName = (char * )pvParameters;
10     for( ;; )
11     {
12         printf( pcTaskName );
13         vTaskDelay(1000/portTICK_PERIOD_MS);
14     }
15 }
16
17 const char *pcTextForTask1 = "Task 1 is running\n";
18 const char *pcTextForTask2 = "Task 2 is running\n";
19
20 void app_main()
21 {
22     xTaskCreate(vTask, "Task 1", 2048, (void *) pcTextForTask1, 1, NULL);
23     xTaskCreate( vTask, "Task 2", 2048, (void *) pcTextForTask2, 1, NULL );
24 }
Ejercicio 14: RETO
En el ejercicio anterior ambas tareas imprimen su mensaje cada 1000 ms. ¿Qué tendrías que hacer para que cada tarea imprima un mensaje diferente y adicionalmente lo haga en intervalos de tiempo distintos?
Implementa tu solución.
Ejercicio 15: ¿Luego de los RTOS hay más?
En este punto del recorrido hemos visitado diferentes maneras de desarrollar aplicaciones
para sistemas embebidos. Desde la arquitectura background/foreground clásica,
utilizada por Arduino, pasando por las máquinas de estado jerárquicas,
hasta los sistemas operativos de tiempo real ilustrados con FreeRTOS. Finalmente, no
quiero dejar pasar esta oportunidad sin contarte una técnica de programación moderna de
sistema embebidos: el patrón de diseño de Active Objects.
Este patrón de diseño sirve para la construcción de software para sistemas de naturaleza
reactiva. Los sistemas reactivos se caracterizan por reaccionar ante la ocurrencia de
eventos. Por ejemplo, la llegada de un mensaje por un puerto de comunicaciones,
la disponibilidad de un dato por parte de un sensor, timeouts, una petición HTTP por
parte de un cliente a un servidor, etc. El software para un sistema reactivo responde a
la ocurrencia de eventos que no tienen necesariamente un orden establecido. En contraste,
el software construido con programación secuencial espera de manera secuencial por la ocurrencia
de un evento específico, haciendo que, mientras espera, no responda a otros eventos.
Por ejemplo, unas líneas de código clásico Arduino:
void setup() {
    pinMode(LED_BUILTIN, OUTPUT);
}

void loop() {
    digitalWrite(LED_BUILTIN, HIGH);
    delay(1000);
    digitalWrite(LED_BUILTIN, LOW);
    delay(1000);
}
En este código de Arduino, mientras se espera por el evento de tiempo (delay(1000)),
el programa no responderá a otros eventos, por ejemplo, la llegada de un nuevo dato por el
puerto serial. Ojo, el framework de arduino si capturará el dato pero tu programa NO
mientras está en espera ocupada en la función delay(1000);.
En esta unidad hemos visto que un sistema operativo de tiempo real permite enfrentar
el problema anterior utilizando múltiples loops (tareas) corriendo concurrentemente
en la misma CPU o de manera paralela en múltiples CPUs. De esta manera,
es posible esperar por múltiples eventos en paralelo. Por ejemplo, una tarea puede esperar
datos del puerto serial mientras que otra espera eventos de tiempo para encender y apagar un LED;
sin embargo, los problemas comienzan cuando las tareas deben sincronizarse y comunicarse
entre ellas. Esto produce una suerte de estado compartido y la necesidad de aplicar
mecanismos de exclusión mutua para evitar condiciones de carrera. Los RTOS brindan mecanismos
para lidiar con lo anterior mediante llamadas bloqueantes al sistema, tales como las colas
de eventos y los semáforos, pero de nuevo, aparecen nuevos problemas como la inanición de
tareas o thread starvation, abrazos mortales o deadlocks e inversión de prioridad o
priority inversion.
Debido a lo anterior, actualmente algunos expertos recomiendan mejores prácticas de desarrollo para sistemas reactivos:
No hacer llamados bloqueantes en el código. Más bien comunicar las tareas de manera asíncrona por medio de eventos.
No compartir datos o recursos entre tareas. Mantener los recursos
encapsuladosen cada tareas y mejor utilizar eventos para compartir información.Organizar las tareas como
bombas de mensajes: con una cola de eventos y un despachador de eventos.
Al uso de estas prácticas se le conoce como programación guiada por eventos. La siguiente
figura, tomada de la presentación Modern Embedded Systems Programming: Beyond the RTOS de
Miro Samek, ilustra cómo se podrían implementar las ideas anteriores
utilizando un sistema operativo de tiempo real:

Se definen objetos o estructura de datos que indica el evento específico y sus parámetros.
Cada tarea tendrá su propia cola de mensajes que almacenará los eventos anteriores.
Las tareas
SÓLOse comunicarán y sincronizarán por medio de eventos enviados a sus colas. No está permitido que las tareas compartan datos o recursos.El envío de mensajes es asíncrono, es decir, ninguna tarea puede esperar (espera bloqueada) por el procesamiento del evento.
El código de la tarea se organiza como una
bomba de eventos. La tarea sólo se bloquea cuando su cola está vacía, no en otra parte del código.Cada evento es procesado antes de procesar el siguiente:
run to completion.
Entonces ¿Qué es el patrón diseño ACTIVE OBJECT?
A todas las buenas prácticas anteriores y a la estrategia de implementación se le conoce como el patrón de Objetos Activos o patrón del Actor. Los objetos activos son objetos de software estrictamente encapsulados que corren sobre sus propios hilos (tarea) y se comunican de manerá asíncrona utilizando eventos.
Esta idea la propuso en los 70s Carl Hewitt en MIT. En los años 90s la metodología ROOM para el modelado de sistemas de tiempo real retomó la idea y posteriormente UML introdujo la noción de objetos activos. Tanto los objetos activos de ROOM como los de UML emplean máquinas de estado jerárquicas para especificar el comportamiento de dichos objetos.
Es posible implementar el patrón de objetos activos manualmente utilizando FreeRTOS;
sin embargo, hay opciones MUY INTERESANTES como el frameworks
QP de quantum leaps:

Ejercicio 16: SOLO PARA LOS MÁS CURIOSOS
Warning
Lo que verás ahora se sale completamente del alcance del curso; sin embargo, la idea es darte una dulce prueba del ejercicio anterior. Si ves COMPLICADO el programa, tienes razón. Usualmente el código anterior es generado automáticamente por una herramienta partiendo del diagrama de estados.
En base a este ejemplo (tomado del proyecto SinelaboreRT), vamos a ilustrar la implementación, mediante un objeto activo, de la tarea modelada por la siguiente máquina de estados jerárquica:

  1 #include "freertos/FreeRTOS.h"
  2 #include "freertos/task.h"
  3 #include "esp_system.h"
  4 #include "esp_log.h"
  5 #include "driver/uart.h"
  6 #include "soc/uart_struct.h"
  7 #include "string.h"
  8 #include "freertos/queue.h"
  9 #include "freertos/timers.h"
 10
 11 static const int RX_BUF_SIZE = 1024;
 12
 13 #define TXD_PIN (GPIO_NUM_4)
 14 #define RXD_PIN (GPIO_NUM_5)
 15 #define GPIO_OUTPUT_IO_0 GPIO_NUM_18
 16
 17 typedef enum{
 18     evTimeout = 0U,
 19     evButton2,
 20     evButton1,
 21     AOBLINK_NO_MSG
 22 }AOBLINK_EVENT_TYPE;
 23
 24 /* Event names */
 25 const char events[] =
 26     "evTimeout\0evButton2\0evButton1\0NO_MSG\0";
 27
 28 const unsigned short evt_idx[] = {0, 10, 20, 30};
 29
 30 QueueHandle_t aoBlinkQueue;
 31
 32 typedef struct
 33 {
 34     AOBLINK_EVENT_TYPE evType;
 35     uint8_t evData;
 36 } evAoBlink;
 37
 38 TimerHandle_t aoTimer;
 39
 40 const char *getNameByEvent(AOBLINK_EVENT_TYPE evt)
 41 {
 42     return (events + evt_idx[evt]);
 43 }
 44
 45 void init()
 46 {
 47     const uart_config_t uart_config = {
 48         .baud_rate = 115200,
 49         .data_bits = UART_DATA_8_BITS,
 50         .parity = UART_PARITY_DISABLE,
 51         .stop_bits = UART_STOP_BITS_1,
 52         .flow_ctrl = UART_HW_FLOWCTRL_DISABLE};
 53     uart_param_config(UART_NUM_1, &uart_config);
 54     uart_set_pin(UART_NUM_1, TXD_PIN, RXD_PIN, UART_PIN_NO_CHANGE, UART_PIN_NO_CHANGE);
 55     // We won't use a buffer for sending data.
 56     uart_driver_install(UART_NUM_1, RX_BUF_SIZE * 2, 0, 0, NULL, 0);
 57
 58     // Configure Output
 59     gpio_intr_disable(GPIO_OUTPUT_IO_0);
 60     gpio_set_level(GPIO_OUTPUT_IO_0, 0);
 61     gpio_pullup_dis(GPIO_OUTPUT_IO_0);
 62     gpio_pulldown_dis(GPIO_OUTPUT_IO_0);
 63     gpio_set_direction(GPIO_OUTPUT_IO_0, GPIO_MODE_OUTPUT);
 64 }
 65
 66 static void aoTimerCallback(TimerHandle_t xTimer)
 67 {
 68     BaseType_t xStatus;
 69     evAoBlink ev;
 70     //printf("Sending timerEvent\r\n");
 71     ev.evType = evTimeout;
 72     ev.evData = 0;
 73     xStatus = xQueueSendToBack(aoBlinkQueue, &ev, 0);
 74     if (xStatus != pdPASS)
 75     {
 76         printf("aoTimerCallback couldn't send\r\n");
 77     }
 78 }
 79
 80 typedef enum
 81 {
 82     Fast,
 83     FastLedOn,
 84     FastLedOff,
 85     Off,
 86     On,
 87     SlowWaitForLastTimeout,
 88     FastWaitForLastTimeout,
 89     Slow,
 90     SlowLedOn,
 91     SlowLedOff,
 92     NUM_STATES // number of states in the machine
 93 } States;
 94
 95 int m_initialized;
 96 typedef struct
 97 {
 98     States stateVar;
 99     States stateVarSlow;
100     States stateVarFast;
101 } stateVarsT;
102
103 stateVarsT stateVars;
104 stateVarsT stateVarsCopy;
105
106 static void initStateMachine(void)
107 {
108     BaseType_t xTimerCreatedStatus;
109
110     if (m_initialized == 0U)
111     {
112         m_initialized = 1U;
113         //Create copy of statevar
114         stateVarsCopy = stateVars;
115         // Set state vars to default states
116         stateVarsCopy.stateVar = Slow;          /* set init state of top state */
117         stateVarsCopy.stateVarSlow = SlowLedOn; /* set init state of Slow */
118         stateVarsCopy.stateVarFast = FastLedOn; /* set init state of Fast */
119         aoTimer = xTimerCreate("aoTimer", pdMS_TO_TICKS(1000UL), pdTRUE, NULL, aoTimerCallback);
120         if (aoTimer != NULL)
121         {
122             printf("aoTimer created\r\n");
123             xTimerCreatedStatus = xTimerStart(aoTimer, 0);
124             if (xTimerCreatedStatus == pdPASS)
125             {
126                 printf("aoTimer started\r\n");
127             }
128         }
129         gpio_set_level(GPIO_OUTPUT_IO_0, pdTRUE);
130         printf("LED OFF \r\n");
131         // Copy state variables back
132         stateVars = stateVarsCopy;
133     }
134 }
135
136 static void aoStateMachine(evAoBlink event)
137 {
138
139     int evConsumed = 0U;
140
141     if (m_initialized == 0U)
142         return;
143
144     //Create copy of statevar
145     stateVarsCopy = stateVars;
146
147     switch (stateVars.stateVar)
148     {
149
150     case Slow:
151
152         switch (stateVars.stateVarSlow)
153         {
154
155         case SlowLedOn:
156             if (event.evType == evTimeout)
157             {
158                 /* Transition from SlowLedOn to SlowLedOff */
159                 evConsumed = 1;
160
161                 /* OnEntry code of state SlowLedOff */
162                 gpio_set_level(GPIO_OUTPUT_IO_0, pdFALSE);
163                 printf("LED OFF\r\n");
164                 /* adjust state variables  */
165                 stateVarsCopy.stateVarSlow = SlowLedOff;
166
167             }
168             else
169             {
170                 /* Intentionally left blank */
171             }      /*end of event selection */
172             break; /* end of case SlowLedOn  */
173
174         case SlowLedOff:
175             if (event.evType == evTimeout)
176             {
177                 /* Transition from SlowLedOff to SlowLedOn */
178                 evConsumed = 1;
179
180                 /* OnEntry code of state SlowLedOn */
181                 gpio_set_level(GPIO_OUTPUT_IO_0, pdTRUE);
182                 printf("LED ON\r\n");
183                 /* adjust state variables  */
184                 stateVarsCopy.stateVarSlow = SlowLedOn;
185             }
186             else
187             {
188                 /* Intentionally left blank */
189             }      /*end of event selection */
190             break; /* end of case SlowLedOff  */
191
192         default:
193             /* Intentionally left blank */
194             break;
195         } /* end switch Slow */
196
197         /* Check if event was already processed  */
198         if (evConsumed == 0)
199         {
200
201             if (event.evType == evButton1)
202             {
203                 /* Transition from Slow to SlowWaitForLastTimeout */
204                 evConsumed = 1;
205
206                 /* adjust state variables  */
207                 stateVarsCopy.stateVar = SlowWaitForLastTimeout;
208             }
209             else if (event.evType == evButton2)
210             {
211                 /* Transition from Slow to Fast */
212                 evConsumed = 1;
213
214                 /* Action code for transition  */
215                 xTimerChangePeriod(aoTimer,pdMS_TO_TICKS(100UL),0);
216                 gpio_set_level(GPIO_OUTPUT_IO_0, pdTRUE);
217                 printf("LED ON\r\n");
218                 stateVarsCopy.stateVar = Fast;          /* Default in entry chain  */
219                 stateVarsCopy.stateVarFast = FastLedOn; /* Default in entry chain  */
220             }
221             else
222             {
223                 /* Intentionally left blank */
224             } /*end of event selection */
225         }
226         break; /* end of case Slow  */
227
228     case Fast:
229
230         switch (stateVars.stateVarFast)
231         {
232
233         case FastLedOn:
234             if (event.evType == evTimeout)
235             {
236                 /* Transition from FastLedOn to FastLedOff */
237                 evConsumed = 1;
238
239                 /* OnEntry code of state FastLedOff */
240                 gpio_set_level(GPIO_OUTPUT_IO_0, pdFALSE);
241                 printf("LED OFF\r\n");
242                 /* adjust state variables  */
243                 stateVarsCopy.stateVarFast = FastLedOff;
244             }
245             else
246             {
247                 /* Intentionally left blank */
248             }      /*end of event selection */
249             break; /* end of case FastLedOn  */
250
251         case FastLedOff:
252             if (event.evType == evTimeout)
253             {
254                 /* Transition from FastLedOff to FastLedOn */
255                 evConsumed = 1;
256
257                 /* OnEntry code of state FastLedOn */
258                 gpio_set_level(GPIO_OUTPUT_IO_0, pdTRUE);
259                 printf("LED ON\r\n");
260
261
262                 /* adjust state variables  */
263                 stateVarsCopy.stateVarFast = FastLedOn;
264
265             }
266             else
267             {
268                 /* Intentionally left blank */
269             }      /*end of event selection */
270             break; /* end of case FastLedOff  */
271
272         default:
273             /* Intentionally left blank */
274             break;
275         } /* end switch Fast */
276
277         /* Check if event was already processed  */
278         if (evConsumed == 0)
279         {
280
281             if (event.evType == evButton1)
282             {
283                 /* Transition from Fast to FastWaitForLastTimeout */
284                 evConsumed = 1;
285
286                 /* adjust state variables  */
287                 stateVarsCopy.stateVar = FastWaitForLastTimeout;
288             }
289             else if (event.evType == evButton2)
290             {
291                 /* Transition from Fast to Slow */
292                 evConsumed = 1;
293
294                 /* Action code for transition  */
295                 xTimerChangePeriod(aoTimer,pdMS_TO_TICKS(1000UL),0);
296                 gpio_set_level(GPIO_OUTPUT_IO_0, pdTRUE);
297                 printf("LED ON\r\n");
298                 stateVarsCopy.stateVar = Slow;          /* Default in entry chain  */
299                 stateVarsCopy.stateVarSlow = SlowLedOn; /* Default in entry chain  */
300             }
301             else
302             {
303                 /* Intentionally left blank */
304             } /*end of event selection */
305         }
306         break; /* end of case Fast  */
307
308     case Off:
309         if (event.evType == evButton1)
310         {
311             /* Transition from Off to Slow */
312             evConsumed = 1;
313
314             /* OnEntry code of state Slow */
315             xTimerChangePeriod(aoTimer,pdMS_TO_TICKS(1000UL),0);
316             gpio_set_level(GPIO_OUTPUT_IO_0, pdTRUE);
317             printf("LED ON\r\n");
318             stateVarsCopy.stateVar = Slow;          /* Default in entry chain  */
319             stateVarsCopy.stateVarSlow = SlowLedOn; /* Default in entry chain  */
320         }
321         else
322         {
323             /* Intentionally left blank */
324         }      /*end of event selection */
325         break; /* end of case Off  */
326
327     case On:
328         if (event.evType == evButton1)
329         {
330             /* Transition from On to Fast */
331             evConsumed = 1;
332
333             /* OnEntry code of state Fast */
334             xTimerChangePeriod(aoTimer,pdMS_TO_TICKS(100UL),0);
335             gpio_set_level(GPIO_OUTPUT_IO_0, pdTRUE);
336             printf("LED ON\r\n");
337             stateVarsCopy.stateVar = Fast;          /* Default in entry chain  */
338             stateVarsCopy.stateVarFast = FastLedOn; /* Default in entry chain  */
339         }
340         else
341         {
342             /* Intentionally left blank */
343         }      /*end of event selection */
344         break; /* end of case On  */
345
346     case SlowWaitForLastTimeout:
347         if (event.evType == evTimeout)
348         {
349             /* Transition from SlowWaitForLastTimeout to Off */
350             evConsumed = 1;
351
352             /* OnEntry code of state Off */
353             xTimerStop(aoTimer,0);
354             gpio_set_level(GPIO_OUTPUT_IO_0, pdFALSE);
355             printf("LED OFF\r\n");
356             /* adjust state variables  */
357             stateVarsCopy.stateVar = Off;
358         }
359         else
360         {
361             /* Intentionally left blank */
362         }      /*end of event selection */
363         break; /* end of case SlowWaitForLastTimeout  */
364
365     case FastWaitForLastTimeout:
366         if (event.evType == evTimeout)
367         {
368             /* Transition from FastWaitForLastTimeout to On */
369             evConsumed = 1;
370
371             /* OnEntry code of state On */
372             xTimerStop(aoTimer,0);
373             gpio_set_level(GPIO_OUTPUT_IO_0, pdTRUE);
374             printf("LED ON\r\n");
375             /* adjust state variables  */
376             stateVarsCopy.stateVar = On;
377         }
378         else
379         {
380             /* Intentionally left blank */
381         }      /*end of event selection */
382         break; /* end of case FastWaitForLastTimeout  */
383
384     default:
385         /* Intentionally left blank */
386         break;
387     } /* end switch stateVar_root */
388     // Copy state variables back
389     stateVars = stateVarsCopy;
390 }
391
392 static void aoBlink(void *pdata)
393 {
394     BaseType_t xStatus;
395     evAoBlink rxEvent;
396
397     initStateMachine();
398
399     while (1)
400     {
401         xStatus = xQueueReceive(aoBlinkQueue, &rxEvent, portMAX_DELAY);
402         if (xStatus == pdPASS)
403         {
404             printf("EV_type:%s-Data: %d\r\n", getNameByEvent(rxEvent.evType), rxEvent.evData);
405             aoStateMachine(rxEvent);
406         }
407     }
408 }
409
410 static void serialTask(void *pdata)
411 {
412     evAoBlink ev;
413     BaseType_t xStatus;
414     uint8_t data[2];
415     printf("serialTask init\r\n");
416     while (1)
417     {
418         const uint8_t rxBytes = uart_read_bytes(UART_NUM_1, data, 1, 1000 / portTICK_RATE_MS);
419         if (rxBytes > 0)
420         {
421             data[rxBytes] = 0;
422             printf("Read: %s\r\n", data);
423             ev.evType = AOBLINK_NO_MSG;
424             if (data[0] == '1')
425                 ev.evType = evButton1;
426             if (data[0] == '2')
427                 ev.evType = evButton2;
428             ev.evData = 0;
429             xStatus = xQueueSendToBack(aoBlinkQueue, &ev, 0);
430             if (xStatus != pdPASS)
431             {
432                 printf("Could not send to the queue.\r\n");
433             }
434         }
435     }
436 }
437
438 void app_main()
439 {
440     init();
441     aoBlinkQueue = xQueueCreate(10, sizeof(evAoBlink));
442     if (aoBlinkQueue != NULL)
443     {
444         printf("aoBlink state machine created\r\n");
445         xTaskCreate(aoBlink, "aoBlink", 1024 * 2, NULL, configMAX_PRIORITIES, NULL);
446         xTaskCreate(serialTask, "serialTask", 1024 * 2, NULL, configMAX_PRIORITIES - 1, NULL);
447     }
448     else
449     {
450         printf("aoBlinkQueue is not created\r\n");
451     }
452 }
Sesión 2
En esta sesión vamos a resolver dudas sobre los ejercicios y escuchar aportes, comentarios y/o experiencias de todos.